

“I’m not sure how to get started with Billbee.” – if you’re facing this problem right now, you’ve come to the right place! We’ll show you how to set up Billbee !
In this blog post, we’ll show you which settings you should focus on as a Billbee newcomer to get set up. At the same time, you’ll find an overview of other settings and features that might be helpful for you. At the end, you’ll also find a collection of selected resources for everything Billbee.
The very first step is, of course, signing up for Billbee. Register with Billbee and put the tool through its paces for 30 days. During the trial period, you already have access to all the features and possibilities that Billbee offers. Once you’ve registered your user account, you can get started right away with the following 7 steps to set up Billbee and start working productively with your account today.
Adding your address to your user account is one of the first things you should definitely do – and for a simple reason. Your address is the starting point for many other actions in Billbee. Based on this address, Billbee can determine which country you are shipping your orders from (provided you haven't specified otherwise in your shop connection).
You can access your user account at any time by clicking on your username in the top right corner. Then navigate to the "Address & Payment" tab. Here you can now enter your billing address and payment information.
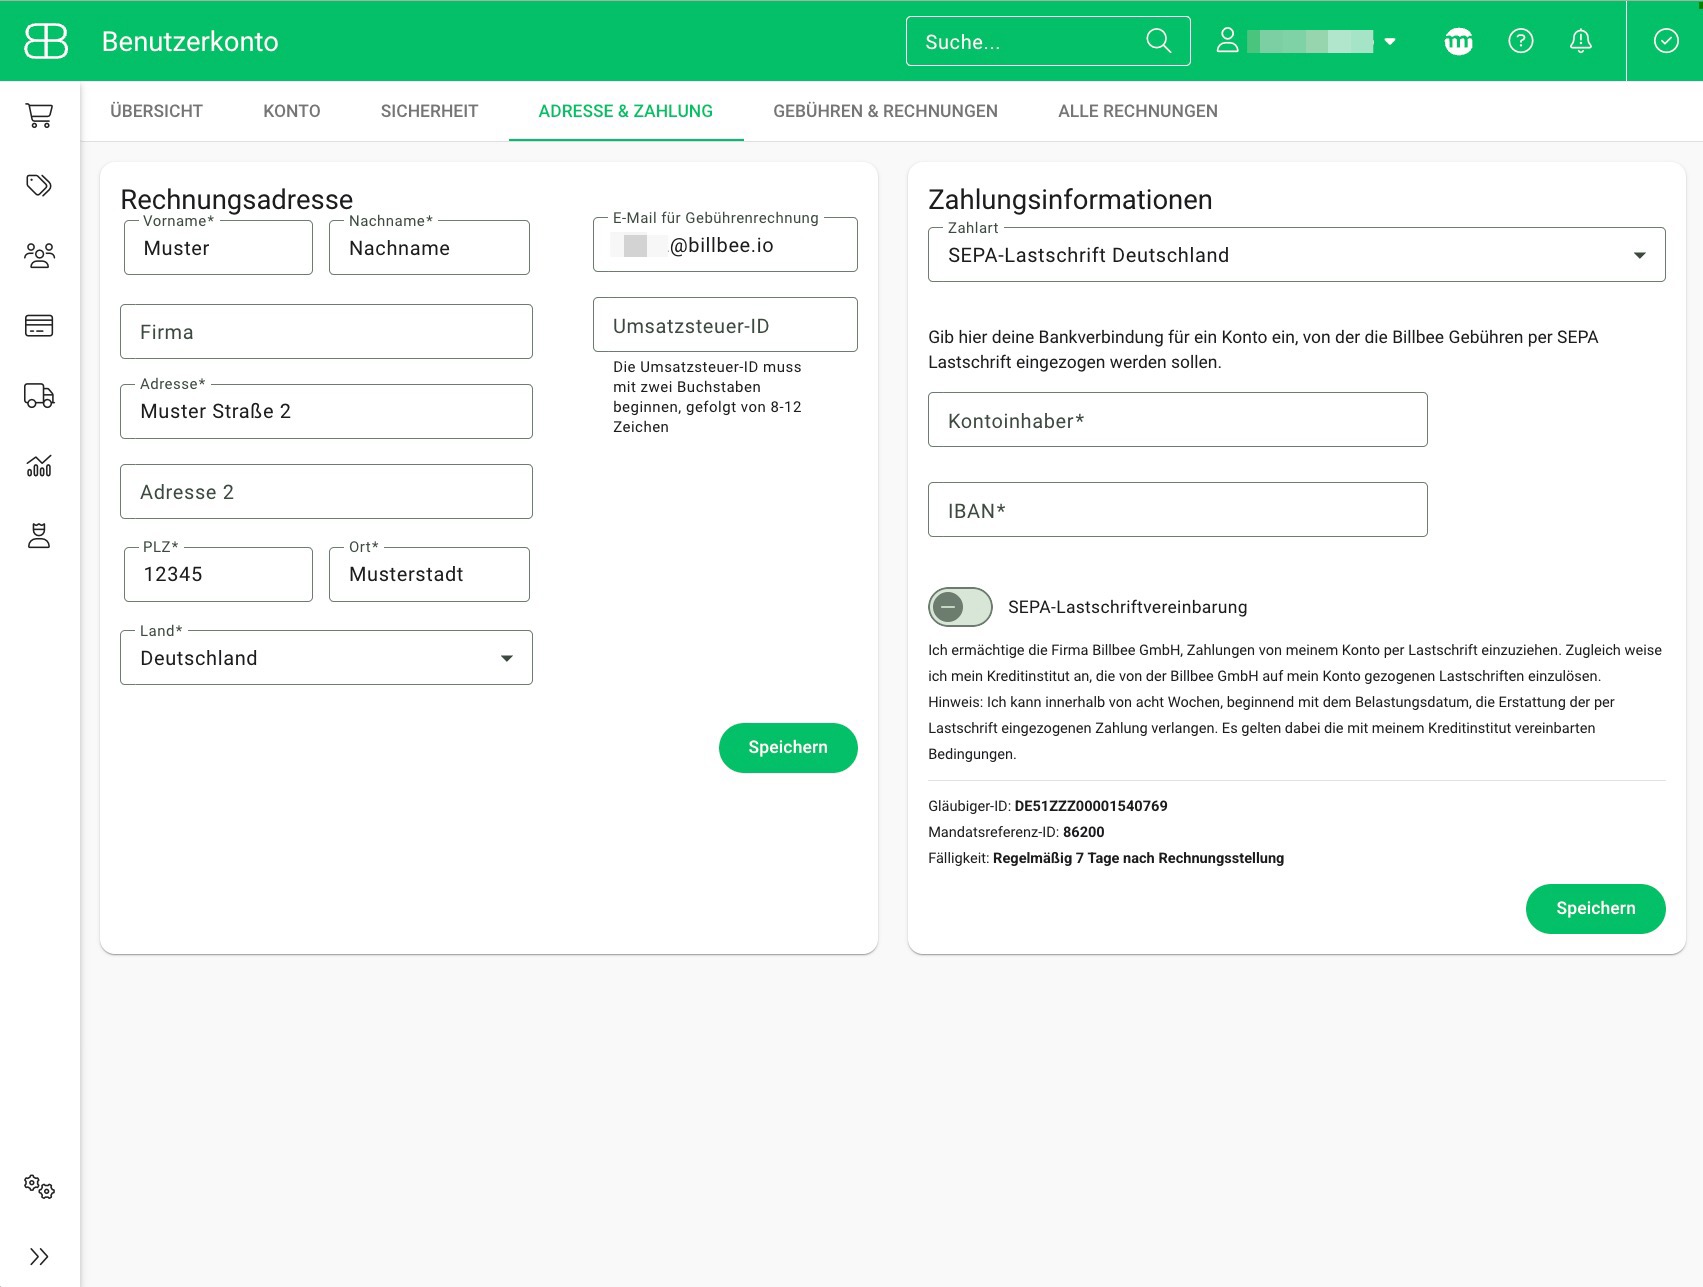
But don’t worry, even if you have added your address to your user account, we won’t automatically send you an invoice after your trial period ends. Whether you want to continue using Billbee after the trial is, of course, entirely up to you.
In our help center, you can find further information about your user account.
One topic that always keeps online retailers busy—and sometimes drives them to despair—is taxes. That is why you should address this topic early on when setting up Billbee.
Before you start with the tax setup in Billbee, you should first be clear about which tax conditions apply to you. Do you fall under the small business regulation, or are your sales subject to standard or differential taxation? A tax office can provide you with legally sound answers to this question. Some tax firms are even familiar with Billbee, which makes them a great point of contact for you.
In Billbee, there are generally three places where you can manage VAT settings:
Settings should be configured in all three areas. When importing orders, Billbee first checks whether the shop or marketplace transmits tax information for the order. Unfortunately, this is not the case with all systems. If your shop system or the marketplace you use does not transmit this information, Billbee checks whether tax information is stored in your products (more on this in step #7). If the product is not yet known, Billbee checks whether a tax index is stored in the shop connection through which the orders were imported and uses that for the order. If the order is one without a shop connection and the product is not yet known, the general tax settings are used.
Billbee uses the tax rates from the country stored in your billing address, which is why step 1 was so important. Billbee can also handle special tax cases, such as distance sales via OSS.
Number ranges help you keep track of your order documents with a clear, consistent numbering system. Instead of managing them manually, you can set them up once in Billbee, and your documents will be numbered automatically. You can create number ranges in Billbee for the following areas:
You can find the settings for configuring number ranges under Settings / Order documents in the "Number ranges" tab. Configure your number ranges exactly as you need them. You can also placeholders to automatically populate specific information when your number ranges are displayed on your documents. You can easily continue using existing number ranges by entering the next available number in the "Number" field.
Detailed information on how to set up number ranges can be found in the corresponding help article or in the YouTube video.

You can also assign number ranges to a shop connection or Number ranges for product SKUs create.
Another component of your order documents, alongside number ranges, is the layout. In the order document layout editor, you can define which information is displayed on your documents and how. You can create layouts for invoices, delivery notes, order confirmations, quotes, labels, and credit notes. Only the layout editor for labels is structured slightly differently than the one for order documents.
You can access the layout editor under Settings / Order documents in the "Layouts" tab. Standard layouts for invoices and delivery notes are already stored there and are used whenever you haven't created a custom layout. You can either modify these or create new layouts.
The layout editor is very comprehensive, but it should not be overlooked when setting up Billbee. It is the only way to ensure your order documents align with your corporate design. You can read all the details on how to create them and all the configuration options in the help article on the layout editor . Would you rather see the layout editor in action? Then check out the YouTube video on creating new layouts.
If you also want to send your created order documents (automatically) via email, you need to set up a so-called SMTP server. The SMTP server ensures that emails are sent on your behalf. Email dispatch is only possible once an SMTP server has been set up. Another advantage is that you can specify a sender address that differs from your user account, and if you have multiple entries, you can even send from different sender addresses.
The time has finally come; the basic preparations for setting up Billbee are complete, and we can now move on to connecting your shop and the marketplaces you use to your account. Billbee supports a wide range of shop systems (e.g., Shopify, ePages, Gambio, Jimdo, Shopware, WooCommerce, and many more) and marketplaces (e.g., Amazon, eBay, Etsy, kaufland.de, OTTO Market, and many more). You can find a complete overview of all supported sales channels on our help page.
You can set up a new connection for your shop or marketplace under Settings / Channels . The connection process always depends on the system you are using, as some shop systems and marketplaces have limitations or support different functionalities. The configuration options within each system may also vary. You can find all the basic settings for shop and marketplace connections in our help article.
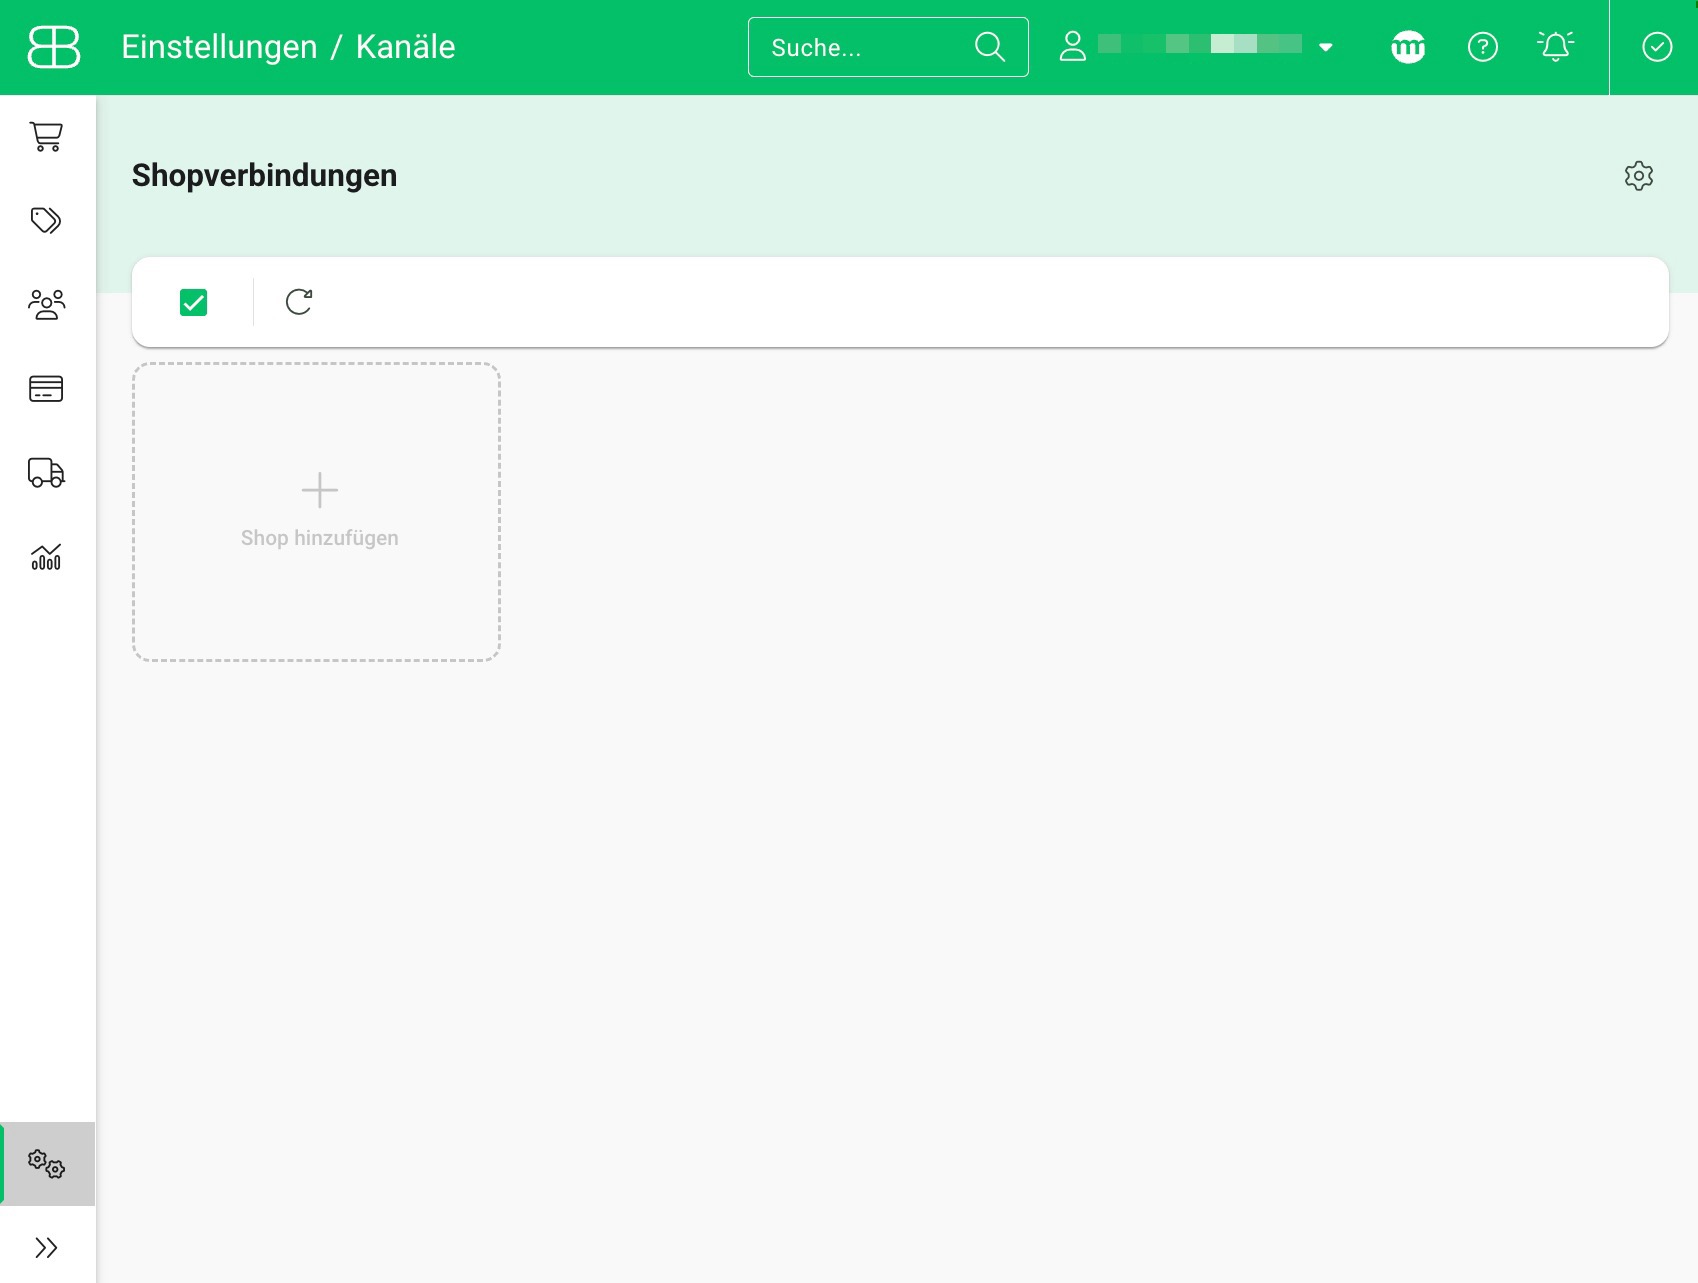
Once you have connected your shops and marketplaces, orders can be imported into Billbee automatically.
And don't forget to configure the control settings for your shop connections directly during the setup process, as mentioned in step #2.
Online retailers typically use a wide variety of different service providers to process their orders. Therefore, in addition to your sales channels, you can also connect services from many other areas:
You can find articles with step-by-step instructions for the respective service providers on our Help Center. Simply enter the name of the service provider in the search field and you are ready to go.
You should also set up these connections right when you start your Billbee account so that you can use the full range of features and get the most out of Billbee.
There are several ways to import your products. Generally, a product is automatically imported from a shop or marketplace when the first order containing that product is imported. However, since not all necessary information is always transmitted during an order import, it is advisable to import your products to Billbee manually beforehand and check them after the import.
You can import your products via your Product overview .

In the top function bar, you will find a cloud icon with a downward-pointing arrow, which is used for importing. Clicking on it will take you to the product import process. You can choose whether you want to import your products directly from your shop or via a file. You can upload files in either the Billbee XLSX format or the Jimdo CSV format. To make it easier to get your data into these formats, you can download sample files in both formats for your products from our help page. If you want to import new products via a file import in the Billbee XLSX format, you must leave the "Product ID" column blank to create a new product.
Congratulations, you have completed the most important basic settings. Now there is (almost) nothing standing in the way of getting started with your Billbee account! But of course, that is not all Billbee can do. ⬇️⬇️⬇️
To give you an overview of everything else you can do with Billbee, we have put together a list of helpful articles that cover advanced features:
This list is by no means exhaustive, as it would simply be far too long given the diverse range of e-commerce use cases.
To help you keep track, we have put together a list of all the resources that can support you in setting up Billbee:
As is often the case in the life of an online retailer, there just isn't enough time! This often means there's no time to set up Billbee yourself. You have to manage shop logistics, take care of your shop and customers, and handle countless other daily tasks.
We have the solution for you: instead of setting up Billbee yourself (even though it's a breeze), you can have it done for you. We have compiled a list of service partners for setup and support on our website who can assist you with configuring your account. Many of these service partners are certified by us. They are also long-time Billbee users themselves, so they know exactly what matters. Choose the right partner from the overview and let them set up Billbee for you.